

Start with visibility, cut waste, then lock in savings with commitments and governance. That three-step sequence is where every successful azure cost optimization program begins, and this guide covers all of it: quick wins you can execute in hours, the Azure-native tools that surface every opportunity, commitment discount programs that compound those savings, and a repeatable FinOps runbook your team can own.
The fastest path to immediate savings:
- Identify idle VMs using Azure Advisor recommendations (based on 30-day CPU/memory usage). Effort: 1–2 hours. Expected impact: a significant portion of compute spend on flagged resources.
- Remove unattached managed disks. Every orphaned disk bills at full rate. Effort: under an hour. Impact: often a notable fraction of storage spend.
- Enable auto-shutdown on dev/test VMs outside business hours (6 PM–8 AM, weekends). Effort: 30 minutes via Azure portal or
az vm auto-shutdown. Impact: up to about two-thirds reduction on those VMs. - Apply storage lifecycle policies to move infrequently accessed blobs to Cool or Archive tiers. Effort: 1 hour. Impact: a substantial reduction on eligible blob storage.
- Delete unprovisioned ExpressRoute circuits. They accrue port charges even with zero traffic. Effort: 15 minutes. Impact: eliminates a fixed monthly line item.
- Tag resources by team and environment before anything else. Without consistent tagging, you will misattribute a significant portion of cloud spend and make suboptimal decisions on every optimization that follows.
Pro Tip: Open Azure Advisor and filter to the "Cost" category first. Sort by "Potential yearly savings" descending. The top five items on that list are your sprint backlog for this week.
Key Takeaways
Visibility, waste removal, and commitment discounts applied in sequence produce the most predictable and durable Azure cost reductions.
| Point | Details |
|---|---|
| Start with visibility and tagging | Without consistent tags, you will misattribute spend and make suboptimal decisions on every optimization that follows. |
| Quick wins first | Auto-shutdown, orphan cleanup, and storage tiering can reduce targeted spend significantly before any commitment purchase. |
| Sequence commitments correctly | Rightsize and validate stable baselines before purchasing Savings Plans or Reservations to avoid locking in waste. |
| Automate exports and alerts | Daily exports to ADLS Gen2 with Power BI dashboards and anomaly alerts scale cost monitoring without manual effort. |
| Mindpodtech accelerates the program | Mindpodtech's fractional cloud architecture service runs discovery through FinOps enablement and delivers a governance runbook your team owns. |
Table of Contents
- What are the highest-ROI quick wins you can finish in a day?
- Which Azure-native tools find and validate savings opportunities?
- How do Savings Plans, Reservations, and Hybrid Benefit compare?
- How do you rightsize VMs and choose the right compute pattern?
- How do you set up tagging, budgets, and FinOps governance?
- How do you automate billing exports and anomaly detection?
- How should you prioritize optimization tasks over 30, 60, and 90 days?
- How Mindpodtech approaches Azure cost optimization in practice
- The trade-offs most teams underestimate
- What Mindpodtech offers for Azure cost management
- Sources
What are the highest-ROI quick wins you can finish in a day?
Three categories of quick wins consistently deliver the best return for the least effort: scheduling, orphan cleanup, and storage tiering. You can run all three in a single maintenance window.
Scheduling wins
Enable automatic shutdown on every non-production VM. In the Azure portal, go to the VM blade, select "Auto-shutdown," and set a daily shutdown time. For bulk operations, the Azure CLI makes this faster:
az vm auto-shutdown --resource-group <rg> --name <vm-name> --time 1800
Pair this with Azure Virtual Machine Scale Sets autoscale rules for workloads that need to stay on but vary in demand.
Orphan resource cleanup
Unattached managed disks, idle public IP addresses, and unused load balancers all bill continuously. Run a Resource Graph query to surface them:
az graph query -q "Resources | where type == 'microsoft.compute/disks' | where properties.diskState == 'Unattached'"
Before deleting anything, snapshot the disk and apply a do-not-delete tag to resources that have legitimate exceptions. That two-minute step prevents the support ticket that costs more than the disk.
Storage tiering
Blobs that haven't been accessed in 30 days belong in Cool tier. After 90 days, Archive is the right call. Set lifecycle management policies in the Storage Account blade under "Data management." This one change on a mature Azure environment frequently surfaces more savings than the VM work.
Pro Tip: Tag orphaned resources with status=pending-delete and a deletion date before removing them. It creates an audit trail and gives application owners a 48-hour window to object.
Which Azure-native tools find and validate savings opportunities?
Three tools do most of the work: Azure Advisor, Azure Cost Management, and the billing APIs. Each serves a different function in the optimization workflow.
Azure Advisor
Advisor analyzes your usage over the trailing 30 days and surfaces specific, prioritized recommendations: resize or shut down underutilized VMs, delete idle ExpressRoute circuits, reconfigure idle virtual network gateways, and purchase reservations for stable workloads. Every recommendation includes an estimated monthly savings figure. Navigate to Advisor > Cost in the portal, or pull recommendations programmatically:
GET https://management.azure.com/subscriptions/{subscriptionId}/providers/Microsoft.Advisor/recommendations?api-version=2023-01-01&$filter=Category eq 'Cost'
Azure Cost Management
Cost Management handles the analytical layer: cost analysis views, budget configuration, anomaly detection, and scheduled exports. The two views you need most are:
- Cost analysis (actual): shows what you were invoiced. Use this for budget tracking and finance reconciliation.
- Cost analysis (amortized): distributes reservation and savings plan charges evenly across the commitment period. Use this for engineering reviews so a single upfront reservation purchase doesn't look like a spike.
Group costs by Resource Group, Tag, and Service to slice spend by team, environment, or product. The tag dimension is only useful if tagging is consistent, which is why enforcement via Azure Policy belongs in your governance setup.
Billing APIs for automation
- Exports API: schedules recurring cost exports to Azure Data Lake Storage Gen2 (ADLS Gen2).
- Cost Details API: on-demand line-item data for EA and MCA accounts.
- Query API: ad-hoc cost queries with filters and groupings, suitable for custom dashboards.
Stage exports into ADLS Gen2, then connect Power BI or Microsoft Fabric for FinOps dashboards. This pipeline scales from a 10-person team to an enterprise with hundreds of subscriptions.
How do Savings Plans, Reservations, and Hybrid Benefit compare?
Commitment discounts are the highest-leverage tool for reducing recurring compute and SQL costs, but choosing the wrong one locks you into a suboptimal structure. Azure Hybrid Benefit and commitment programs differ meaningfully in flexibility, scope, and the workload profiles they suit best.
| Program | Flexibility | Typical discount vs. pay-as-you-go | Applicable resources | Commitment length |
|---|---|---|---|---|
| Azure Savings Plans for Compute | High (any compute service, any region) | Up to about two-thirds | VMs, App Service, Container Instances, Functions | 1 or 3 years |
| Azure Reservations | Low (specific SKU and region) | Up to ~72% on eligible SKUs | VMs, SQL, Cosmos DB, Storage, and more | 1 or 3 years |
| Azure Hybrid Benefit | N/A (license-based) | a notable fraction additional on top of other discounts | Windows Server VMs, SQL Server, Azure SQL | Ongoing (license-based) |
Decision checklist
- Workload is predictable and you know the exact SKU: choose Reservations for the deepest discount.
- Workload is predictable but you want flexibility to change instance types or regions: choose Savings Plans.
- You have existing Windows Server or SQL Server licenses with Software Assurance: apply Hybrid Benefit first, then layer Savings Plans or Reservations on top.
- Workload is variable or you haven't yet rightsized: wait. Committing to waste is the most common and most expensive mistake in Azure financial management.
A Forrester-commissioned study modeled a composite enterprise with $12.5M in annual Azure spend and found that combining migration, governance, and commitment discounts produced material cost efficiency improvements. The key word is combining: commitments alone, without the governance layer, tend to underperform because teams over-commit on workloads they later retire.
Pro Tip: Run the Azure Pricing Calculator to model your current pay-as-you-go spend against a 1-year Savings Plan before committing. The calculator lets you input actual usage hours and shows the break-even point.
How do you rightsize VMs and choose the right compute pattern?
Rightsizing follows a five-step process: measure, model, test, apply, monitor. Skip any step and you risk either under-provisioning a production workload or locking in a size that's still too large.
The five-step process
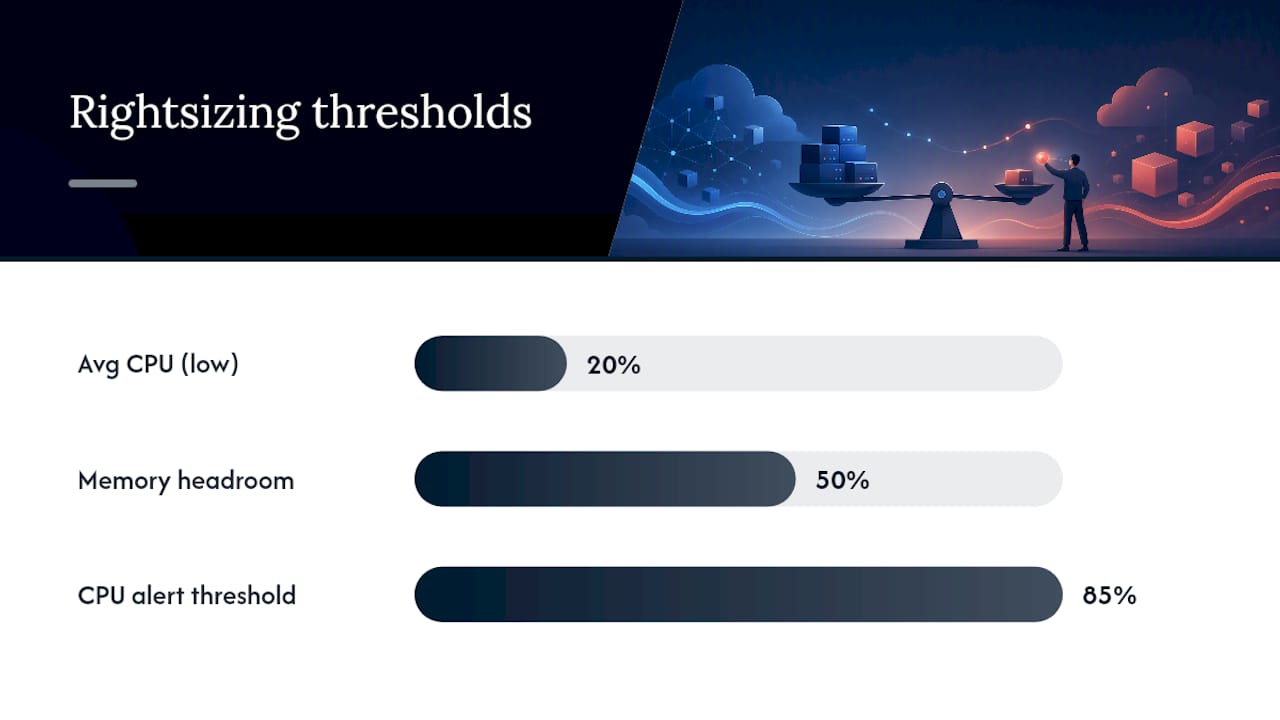
- Measure: collect 30 days of CPU, memory, disk I/O, and network metrics from Azure Monitor. Flag VMs averaging below 20% CPU with memory headroom above 50%.
- Model: use Advisor's resize recommendations as a starting point, but cross-check against peak usage windows. A VM that averages 15% CPU but spikes to 85% during batch jobs needs a different answer than one that's flat at 15%.
- Test: resize in a staging environment first. Validate application performance under load before touching production.
- Apply: resize during a low-traffic window. For VMs in availability sets, resize one instance at a time.
- Monitor: watch the metrics for 7 days post-resize. Set an Azure Monitor alert at 85% CPU to catch under-provisioning early.
Workload-to-pattern mapping
| Workload profile | Recommended compute pattern | Storage pattern | Key tradeoff |
|---|---|---|---|
| Batch / data processing | Spot VMs or Spot node pools (AKS) | Standard HDD or Blob (Hot) | Eviction risk; build retry logic |
| Web front end (variable traffic) | VMSS with autoscale or App Service | Premium SSD (OS), Blob (assets) | Cold-start latency on scale-in |
| Analytics / BI | Synapse or Fabric (serverless SQL) | ADLS Gen2 (Cool/Archive for raw) | Query cost per TB scanned |
| Dev/test | B-series burstable VMs + auto-shutdown | Standard SSD | No SLA needed; schedule aggressively |
| Stateful database | Reserved VM + Elastic Pool (SQL) | Premium SSD (P-series) | Reservation lock-in risk if workload changes |
Spot instances deserve a specific note: they are excellent for batch jobs, CI/CD pipelines, and rendering workloads, but they require eviction handling in your application code. Azure VM cost planning guidance recommends designing for eviction from day one rather than retrofitting it. The teams that skip this step end up with spot instances they're afraid to use.
Practitioner guidance is consistent on sequencing: complete visibility and rightsizing before purchasing commitments. Committing to a specific SKU before you've validated the right size means you're locking in the wrong answer at a discount.
How do you set up tagging, budgets, and FinOps governance?
Governance is what makes savings repeatable. Without it, teams optimize once and drift back to full pay-as-you-go within two quarters.
Tagging strategy
Enforce a mandatory tag set via Azure Policy: Environment (prod/staging/dev/test), Team, CostCenter, Application, and Owner. Apply tags at the resource group level and use inheritance policies to propagate them to child resources. Any resource missing a mandatory tag should trigger a policy deny or audit effect, depending on your tolerance for enforcement friction.
Budget design
Set budgets at three levels: subscription, resource group, and application. Connect budget alerts to Action Groups that notify the owning team via email or Teams webhook, and optionally trigger an Azure Automation runbook to investigate or throttle non-critical resources.
Use both actual and amortized budget views. Well-Architected guidance is explicit: actual costs and amortized costs tell different stories, and relying on only one masks the true normalized daily cost of your commitments.
Monthly cost review runbook (copy-ready)
| Step | Owner | Artifact |
|---|---|---|
| Pull amortized cost report by team/app | FinOps lead | Cost export CSV |
| Review Advisor recommendations | Cloud architect | Prioritized action list |
| Validate reservation utilization | Cloud architect | Utilization report (>80% target) |
| Review budget vs. actuals | Finance manager | Variance report |
| Assign remediation tasks | Team leads | Jira/ADO tickets |
| Update forecast for next 60 days | FinOps lead | Updated forecast |
The Well-Architected Framework frames cost optimization as a continuous cycle, not a project. That framing matters operationally: it means the runbook above should be a recurring calendar event, not a one-time exercise.
How do you automate billing exports and anomaly detection?
Manual cost reviews don't scale. The goal is a pipeline that surfaces anomalies before your finance team asks about them.

Recommended pipeline
Cost Management exports → ADLS Gen2 → Microsoft Fabric or Synapse Analytics → Power BI FinOps dashboard. This architecture handles everything from a single subscription to hundreds, and it separates raw data storage from compute and visualization so each layer can scale independently.
API setup
Schedule daily exports using the Exports API. For on-demand queries, use the Query API with a filter on the billing period and a group-by on ResourceGroup and Tags. For line-item detail on EA or MCA accounts, the Cost Details API returns the full invoice breakdown.
Azure cost management best practices recommend setting up daily exports to ADLS Gen2 and using budget-triggered Action Groups to run automation when thresholds are hit. That combination gives you both scheduled reporting and reactive alerting from a single configuration.
Anomaly detection workflow
Azure Cost Management's built-in anomaly detection flags unusual spend patterns at the subscription and resource group level. When an alert fires: (1) open the anomaly details view to identify the resource and service driving the spike, (2) check recent deployments or scaling events in the Activity Log, (3) remediate or acknowledge, and (4) document in a brief postmortem so the pattern informs future budget calibration.
Automation checklist
- Daily: export cost data to ADLS Gen2
- Weekly: aggregate by team/application, refresh Power BI dataset
- Monthly: reconcile actuals vs. forecast, validate reservation utilization
- Quarterly: review commitment coverage and evaluate new Savings Plan or Reservation purchases
Pro Tip: Validate export completeness by checking row counts against the prior day's export. A missing or truncated file is common after Azure service updates and will silently corrupt your trend analysis if you don't catch it.
How should you prioritize optimization tasks over 30, 60, and 90 days?
Prioritize by four factors: expected ROI, implementation risk, required approvals, and visibility accuracy. A high-ROI action that requires a 6-week change control process should rank below a medium-ROI action you can complete in an afternoon.
30/60/90-day plan
-
Days 1–30 (Quick wins and visibility)
- Run Azure Advisor cost recommendations and action the top 5 items
- Enable auto-shutdown on all dev/test VMs
- Audit and remove unattached disks, idle public IPs, and unprovisioned ExpressRoute circuits
- Deploy mandatory tagging policy and begin tag remediation sprint
- Set up Cost Management exports to ADLS Gen2
- Configure subscription-level budgets with 80%/100%/110% alerts
-
Days 31–60 (Commitments and rightsizing)
- Complete 30-day baseline measurement for rightsizing candidates
- Resize or change VM families for flagged workloads
- Evaluate and purchase Savings Plans or Reservations for stable workloads
- Apply Azure Hybrid Benefit to eligible Windows/SQL workloads
- Build Power BI FinOps dashboard from ADLS Gen2 exports
-
Days 61–90 (Automation and governance)
- Automate anomaly detection alerts with Action Group remediation runbooks
- Conduct first monthly cost review using the runbook template
- Establish DRI (directly responsible individual) ownership for each cost center
- Set quarterly commitment review cadence
- Measure and report: monthly run-rate reduction, reservation utilization rate, tag coverage percentage
Success metrics to track
- Monthly run-rate reduction vs. baseline (target: measurable reduction within 60 days)
- Reservation utilization rate (target: above 80%)
- Tag coverage across billable resources (target: above 90%)
- Anomaly alert count and mean time to resolution
How Mindpodtech approaches Azure cost optimization in practice
Mindpodtech's implementation approach follows a five-phase sequence: discovery, quick wins, commitments, FinOps enablement, and automation. Each phase has defined owners, artifacts, and exit criteria so nothing stalls in ambiguity.
Phase checklist and timeline
- Week 1–2 (Discovery): inventory all subscriptions, export 90 days of cost data, run Advisor, identify top 10 savings opportunities by dollar value. Artifact: prioritized savings register.
- Week 3–4 (Quick wins): execute auto-shutdown, orphan cleanup, and storage tiering. Artifact: before/after cost comparison by resource group.
- Week 5–6 (Commitments): rightsize flagged VMs, apply Hybrid Benefit, purchase Savings Plans for validated stable workloads. Artifact: commitment coverage report.
- Week 7–8 (FinOps enablement): deploy tagging policy, configure budgets and alerts, establish monthly review cadence. Artifact: governance runbook and DRI assignments.
- Week 9–10 (Automation): build export pipeline to ADLS Gen2, connect Power BI dashboard, configure anomaly detection. Artifact: live FinOps dashboard.
Realized savings across engagements vary by environment maturity, but the pattern is consistent: quick wins in weeks 3–4 typically cover the cost of the engagement, and commitment discounts compound those savings over the following 12 months.
What to watch for
- Security and compliance: rightsizing and auto-shutdown changes require coordination with security teams. Confirm that VM shutdown doesn't break backup schedules or compliance logging agents.
- Staging changes: always test resize operations in non-production first. A VM family change can affect network performance characteristics.
- Rollback plan: snapshot disks before deletion, document every configuration change, and keep a 30-day rollback window for commitment purchases (Azure allows cancellation within 72 hours for reservations).
Pro Tip: Run the discovery phase with read-only access first. You get the full savings picture without any risk of accidental changes, and it builds trust with application owners who are skeptical of external optimization work.
The trade-offs most teams underestimate
The conventional wisdom on Azure cost optimization treats it as a purely technical exercise: find waste, remove it, buy commitments. That framing misses the harder problem.
The real challenge is organizational. Engineering teams optimize for reliability and velocity. Finance teams optimize for budget predictability. Those goals conflict, and the conflict shows up in every reservation purchase decision, every auto-shutdown policy, and every tagging enforcement debate. The teams that sustain savings over 12 months are the ones that resolved that conflict structurally, with clear DRI ownership, a shared cost-per-unit-of-value metric, and a monthly review that engineering and finance attend together.
The other underestimated trade-off is cost versus resilience. Spot instances are cheap until an eviction takes down a batch job that feeds a production report. Archive storage is cheap until a compliance audit requires data retrieval in under an hour. Every optimization decision carries a resilience assumption, and that assumption should be explicit. The Azure Well-Architected Framework's cost optimization principles frame it correctly: a workload is cost-optimized when every dollar is justified by business output, not when raw spend is minimized.
Invest first in visibility and tagging. The ROI is immediate, the risk is near zero, and it makes every subsequent decision more accurate. Commitment discounts are powerful, but they amplify good decisions and lock in bad ones.
What Mindpodtech offers for Azure cost management
Mindpodtech delivers cloud architecture and cost optimization as a core advisory service, not a side project. For teams that need to reduce Azure expenses without a full-time FinOps hire, the engagement model fits: a fractional cloud architect runs the discovery and quick-wins phases, hands off a governance runbook the internal team owns, and stays available for commitment decisions and quarterly reviews.
A free technology assessment scopes your current Azure spend, identifies the top savings opportunities by dollar value, and produces a prioritized plain-language plan you keep regardless of next steps. Most teams see the largest quick-win opportunities identified within the first week. From there, Mindpodtech can deliver and run the full optimization program, or hand the plan to your internal team to execute.
Request a free Azure cost assessment at Mindpodtech and get a clear picture of where your spend is going and what to do about it.
Sources
- Tutorial - Reduce Azure costs with recommendations
- Azure Hybrid Benefit
- Azure Cost Optimization: The Complete Guide (2026)
This article is general information, not a substitute for advice from a qualified financial advisor. Consult a qualified financial professional about your own circumstances before acting on anything here.